
Labeling Data
Labeling Sound Files
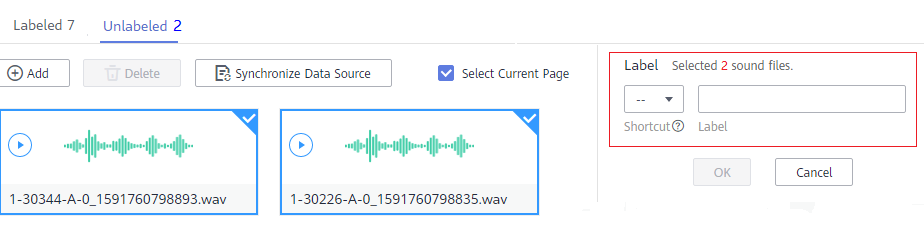
- Select an unlabeled sound file. On the Label Data tab page, click the Unlabeled tab. All unlabeled sound files are displayed. Select the sound files to be labeled in sequence, or tick Select Current Page to select all sound files on the page, and then add labels to the sound files in the right pane.
Figure 1 Labeling a sound file
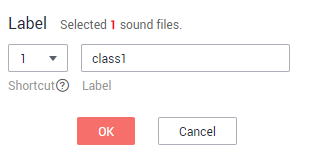
- Add a label. Play a sound file, and select the sound file. In the Label area, enter a label name or select an existing label from the drop-down list on the right, and select a shortcut from the drop-down list on the left. Click OK. The selected sound file is labeled.
Figure 2 Labeling a sound file
- After all the sound files are labeled, view them on the Labeled tab page or view the list of All Labels in the right pane to learn the name and quantity of the labels.
Synchronizing or Adding Sound Files
- Add Audio: You can quickly add sound files on a local PC to ModelArts and synchronize the files to the OBS path specified during project creation. Click Add Audio. In the dialog box that is displayed, click Add Audio and add sound files.

Only 16-bit WAV files are supported. The size of a sound file cannot exceed 4 MB. The total size of all sound files uploaded in one attempt cannot exceed 8 MB.
- Synchronize Data Source: To quickly obtain the latest sound files in the OBS bucket, click Synchronize Data Source to add sound files in OBS to ModelArts.
- Delete Audio: You can delete sound files one by one, or tick Select Current Page to delete all sound files on the page.
The deleted sound files cannot be recovered. Exercise caution when performing this operation.
Modifying Labeled Data
After labeling data, you can modify the labeled data on the Labeled tab page.
- Modifying based on audio
On the dataset details page, click the Labeled tab. Select one or more audio files to be modified from the audio list. Modify the label in the label details area on the right.
- Modifying a label: In the File Labels area, click the editing icon in the Operation column, enter the correct label name in the text box, and click the check mark icon.
- Deleting a label: In the File Labels area, click the deletion icon in the Operation column. In the displayed dialog box, click OK.
- Modifying based on labels
On the Label Data tab page, click the Labeled tab. The information about all labels is displayed on the right.
Figure 3 Information about all labels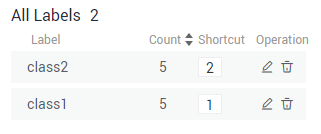
- Modifying a label: Click the editing icon in the Operation column. In the dialog box that is displayed, enter the new label name, select the new shortcut key, and click OK. After the modification, the new label applies to the audio files that contain the original label.
- Deleting a label: Click the deletion icon in the Operation column. In the displayed dialog box, select the object to be deleted as prompted and click OK.
Feedback
Was this page helpful?
Provide feedbackThank you very much for your feedback. We will continue working to improve the documentation.See the reply and handling status in My Cloud VOC.
For any further questions, feel free to contact us through the chatbot.
Chatbot


